
项目地址:https://github.com/zcs19960929/dynamic-datasource
一、多数据源
实现多数据源的方式不外乎有一下几种:
使用分包方式,不同的数据源配置不同的 MapperScan 和 mapper 文件
使用 AOP 切片方式,实现动态数据源切换
使用数据库代理中间件
不同方式之前的区别:
分包方式可以集合 JTA(JAVA Transactional API) 实现分布式事务,但是整个流程的实现相对来说比较复杂
AOP 动态配置数据源方式缺点在于无法实现全局分布式事务,所以如果只是对接第三方数据源,不涉及到需要保证分布式事务的话,是可以作为一种选择
使用数据库代理中间件方式是现在比较流行的一种方式,很多大厂也是使用这种方式,开发者不需要关注太多与业务无关的问题,把它们都交给数据库代理中间件去处理,大量的通用的数据聚合,事务,数据源切换都由中间件来处理,中间件的性能与处理能力将直接决定应用的读写性能,比较常见的有 Mycat、TDDL 等
这里我们直接使用mybatis-plus的dynamic-datasource来实现
引入依赖
<dependency>
    <groupId>com.baomidou</groupId>
    <artifactId>dynamic-datasource-spring-boot-starter</artifactId>
    <version>4.3.1</version>
</dependency>

<dependency>
    <groupId>com.baomidou</groupId>
    <artifactId>mybatis-plus-boot-starter</artifactId>
    <version>3.4.0</version>
</dependency>
配置数据源
### 设置hikari全局连接池配置
spring.datasource.type=com.zaxxer.hikari.HikariDataSource
# 最小空闲数量
spring.datasource.dynamic.hikari.min-idle=10
# 连接池最大数量
spring.datasource.dynamic.hikari.max-pool-size=100
# 连接超时时间
spring.datasource.dynamic.hikari.connection-timeout=60
# 其它配置项请见hikari官方配置说明

### 设置druid全局连接池配置
#spring.datasource.type=com.alibaba.druid.pool.DruidDataSource
#spring.datasource.dynamic.druid.initial-size=5
#spring.datasource.dynamic.druid.min-idle=10
#spring.datasource.dynamic.druid.max-active=20
#spring.datasource.dynamic.druid.max-wait=60000
#spring.datasource.dynamic.druid.time-between-eviction-runs-millis=60000
#spring.datasource.dynamic.druid.min-evictable-idle-time-millis=300000
#spring.datasource.dynamic.druid.max-evictable-idle-time-millis=900000
#spring.datasource.dynamic.druid.validation-query=SELECT 1 FROM DUAL

### set default datasource
#设置默认的数据源或者数据源组,默认值即为master
spring.datasource.dynamic.primary=master
#严格匹配数据源,默认false. true未匹配到指定数据源时抛异常,false使用默认数据源
spring.datasource.dynamic.strict=false
#是否优雅关闭数据源,等待一段时间后再将数据源销毁
spring.datasource.dynamic.grace-destroy=true
#主配置
spring.datasource.dynamic.datasource.master.url=jdbc:mysql://localhost:3306/test1?useUnicode=true&characterEncoding=utf-8&useSSL=false
spring.datasource.dynamic.datasource.master.username=root
spring.datasource.dynamic.datasource.master.password=root
spring.datasource.dynamic.datasource.master.driver-class-name=com.mysql.cj.jdbc.Driver
#从库配置
spring.datasource.dynamic.datasource.slave_1.url=jdbc:mysql://localhost:3306/test2?useUnicode=true&characterEncoding=utf-8&useSSL=false
spring.datasource.dynamic.datasource.slave_1.username=root
spring.datasource.dynamic.datasource.slave_1.password=root
spring.datasource.dynamic.datasource.slave_1.driver-class-name=com.mysql.cj.jdbc.Driver
# 这里可以单独对slave_1数据源的连接池进行配置
spring.datasource.dynamic.datasource.slave_1.hikari.min-idle=5

spring.datasource.dynamic.datasource.slave_2.url=jdbc:mysql://localhost:3306/test3?useUnicode=true&characterEncoding=utf-8&useSSL=false
spring.datasource.dynamic.datasource.slave_2.username=root
spring.datasource.dynamic.datasource.slave_2.password=root
spring.datasource.dynamic.datasource.slave_2.driver-class-name=com.mysql.cj.jdbc.Driver
在代码中指定数据源
在持久层使用@DS注解指定数据源,@DS可以注解在方法上或类上,同时存在就近原则,方法上注解优先于类上注解
这里配置了主数据源名称是master,从库有salve_1和slave_2,使用@DS("master") 表示使用master数据源,使用@DS("slave_1")表示使用slave_1数据源,使用@DS("slave")表示使用从数据源组,会从salve_1和slave_2中随机选择
@DS("slave_1")
public interface TeacherMapper extends BaseMapper<TeacherPO> {
}
@DS("master")
public interface StudentMapper extends BaseMapper<StudentPO> {
}public interface TeacherService extends IService<TeacherPO> {
}public interface StudentService extends IService<StudentPO> {
}@Service
public class TeacherServiceImpl extends ServiceImpl<TeacherMapper, TeacherPO> implements TeacherService{
}@Service
public class StudentServiceImpl extends ServiceImpl<StudentMapper, StudentPO> implements StudentService {
}package com.example.dynamicdatasource;
import com.baomidou.mybatisplus.core.conditions.query.LambdaQueryWrapper;
import com.example.dynamicdatasource.entity.StudentPO;
import com.example.dynamicdatasource.entity.TeacherPO;
import com.example.dynamicdatasource.service.StudentService;
import com.example.dynamicdatasource.service.TeacherService;
import org.junit.jupiter.api.Test;
import org.junit.runner.RunWith;
import org.springframework.boot.test.context.SpringBootTest;
import org.springframework.test.context.junit4.SpringJUnit4ClassRunner;
import javax.annotation.Resource;
@SpringBootTest
@RunWith(SpringJUnit4ClassRunner.class)
class DynamicDatasourceApplicationTests {
@Resource
private StudentService studentService;
@Resource
private TeacherService teacherService;
@Test
void contextLoads() {
}
@Test
void createStudent() {
StudentPO studentPO = StudentPO.builder()
.name("zhangsan")
.age(16)
.build();
studentService.save(studentPO);
}
@Test
void queryStudent() {
StudentPO studentPO = studentService.getOne(new LambdaQueryWrapper<StudentPO>()
.eq(StudentPO::getName, "zhangsan")
.last("limit 1"));
System.out.println(studentPO);
}
@Test
void createTeacher() {
TeacherPO teacherPO = TeacherPO.builder()
.name("teacher ma")
.age(38)
.build();
teacherService.save(teacherPO);
}
@Test
void queryTeacher() {
TeacherPO teacherPO = teacherService.getOne(new LambdaQueryWrapper<TeacherPO>()
.eq(TeacherPO::getName, "teacher ma")
.last("limit 1"));
System.out.println(teacherPO);
}
}
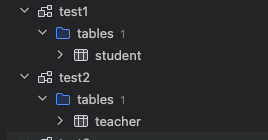
数据库如下,test1中是student表,test2中是teacher表
运行createStudent方法可以看到正常往test1库中的student表中插入了一条数据


运行queryStudent方法可以看到能够正常查询出结果

事务管理
通过@DSTransactional注解开启事务
@Override
@DSTransactional
public void saveTeacherAndStudent(TeacherPO teacher, StudentPO student) {
teacherService.save(teacher);
int a = 1 / 0;
studentService.save(student);
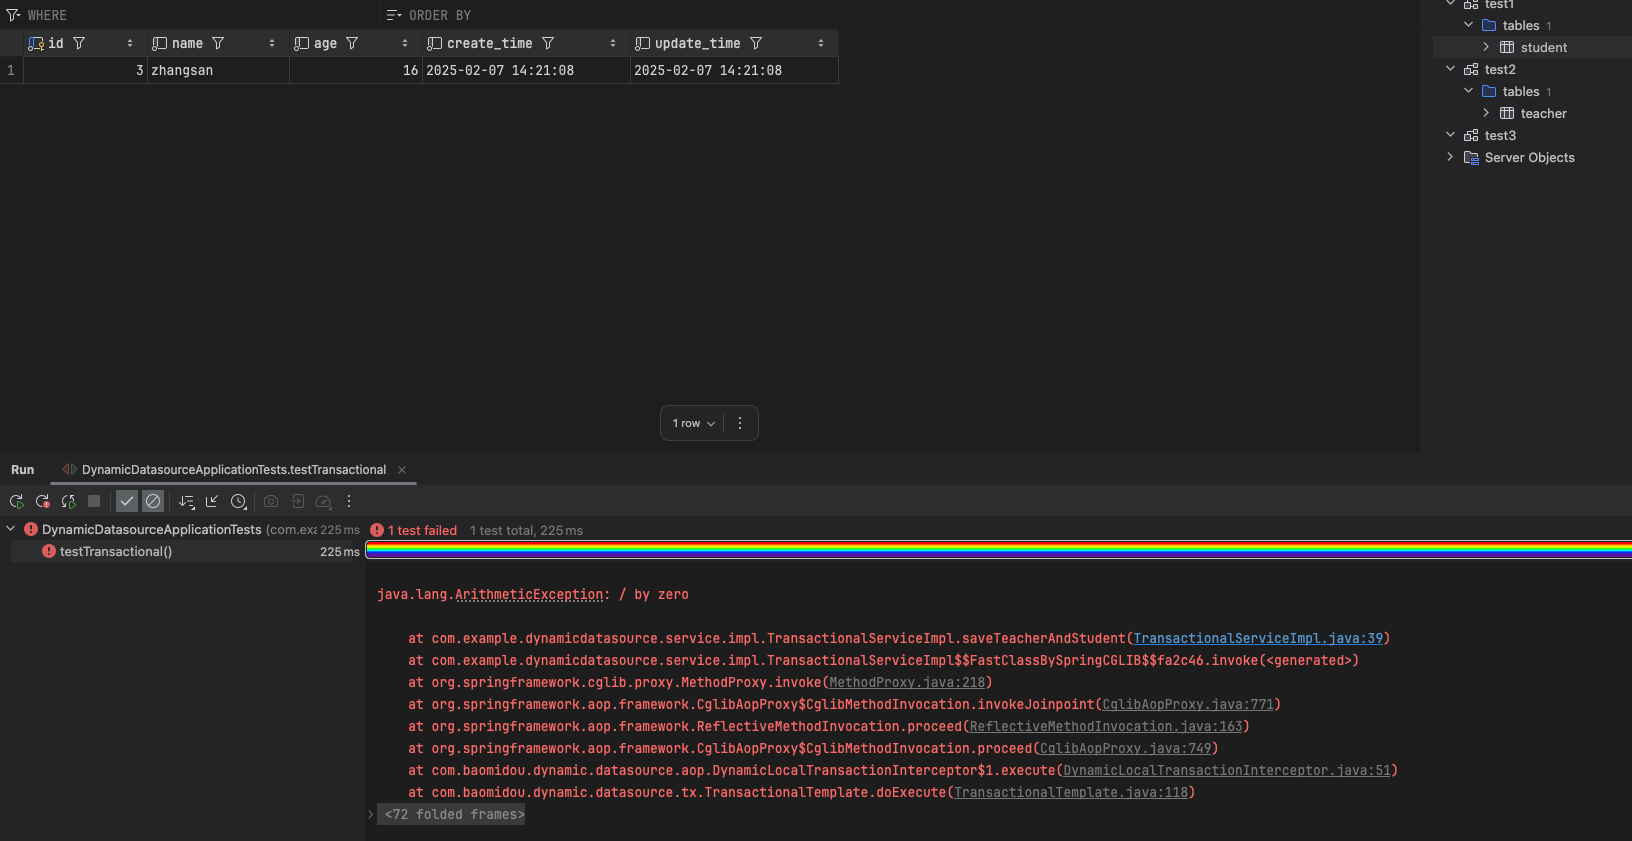
}@Test
void testTransactional() {
StudentPO studentPO = StudentPO.builder()
.name("lisi")
.age(16)
.build();
TeacherPO teacherPO = TeacherPO.builder()
.name("teacher zhang")
.age(38)
.build();
transactionalService.saveTeacherAndStudent(teacherPO, studentPO);
}开启一个事务,在同一个事务内保存teacher和student,中间模拟了一个异常,看事务是否能够正常回滚
二、p6spySQL日志分析
引入依赖
<!-- SQL分析与打印 -->
<!-- https://mvnrepository.com/artifact/p6spy/p6spy -->
<dependency>
    <groupId>com.github.gavlyukovskiy</groupId>
    <artifactId>p6spy-spring-boot-starter</artifactId>
    <version>1.10.0</version>
</dependency>
配置文件
数据源配置
#主配置
spring.datasource.dynamic.datasource.master.url=jdbc:p6spy:mysql://localhost:3306/test1?useUnicode=true&characterEncoding=utf-8&useSSL=false
spring.datasource.dynamic.datasource.master.username=root
spring.datasource.dynamic.datasource.master.password=root
spring.datasource.dynamic.datasource.master.driver-class-name=com.p6spy.engine.spy.P6SpyDriver
#从库配置
spring.datasource.dynamic.datasource.slave_1.url=jdbc:p6spy:mysql://localhost:3306/test2?useUnicode=true&characterEncoding=utf-8&useSSL=false
spring.datasource.dynamic.datasource.slave_1.username=root
spring.datasource.dynamic.datasource.slave_1.password=root
spring.datasource.dynamic.datasource.slave_1.driver-class-name=com.p6spy.engine.spy.P6SpyDriver
# 这里可以单独对slave_1数据源的连接池进行配置
spring.datasource.dynamic.datasource.slave_1.hikari.min-idle=5

spring.datasource.dynamic.datasource.slave_2.url=jdbc:p6spy:mysql://localhost:3306/test3?useUnicode=true&characterEncoding=utf-8&useSSL=false
spring.datasource.dynamic.datasource.slave_2.username=root
spring.datasource.dynamic.datasource.slave_2.password=root
spring.datasource.dynamic.datasource.slave_2.driver-class-name=com.p6spy.engine.spy.P6SpyDriver

# https://github.com/gavlyukovskiy/spring-boot-data-source-decorator
decorator.datasource.p6spy.enable-logging=true
decorator.datasource.p6spy.log-format=\ntime:%(executionTime) || sql:%(sql)\n
decorator.datasource.p6spy.logging=slf4j
decorator.datasource.p6spy.multiline=true
decorator.datasource.p6spy.log-file=spy.logy
p6spy配置
# 3.2.1以上使用
modulelist=com.baomidou.mybatisplus.extension.p6spy.MybatisPlusLogFactory,com.p6spy.engine.outage.P6OutageFactory
# 3.2.1以下使用或者不配置
#modulelist=com.p6spy.engine.logging.P6LogFactory,com.p6spy.engine.outage.P6OutageFactory
# 自定义日志打印
logMessageFormat=com.baomidou.mybatisplus.extension.p6spy.P6SpyLogger
# 日志输出到控制台, 红色日志
#appender=com.baomidou.mybatisplus.extension.p6spy.StdoutLogger
# 使用日志系统记录 sql
appender=com.p6spy.engine.spy.appender.Slf4JLogger
# 设置 p6spy driver 代理
deregisterdrivers=true
# 取消JDBC URL前缀
useprefix=true
# 配置记录 Log 例外,可去掉的结果集有error,info,batch,debug,statement,commit,rollback,result,resultset.
#excludecategories=info,debug,result,commit,resultset
# 日期格式
dateformat=yyyy-MM-dd HH:mm:ss
# 实际驱动可多个
#driverlist=org.h2.Driver
# 是否开启慢SQL记录
outagedetection=true
# 慢SQL记录标准 2 秒
outagedetectioninterval=2
注意事项
driver-class-name应配置为p6spy提供的驱动类。url前缀应为jdbc:p6spy,后跟实际的数据库连接地址。如果打印的SQL为
null,请在excludecategories中增加commit。如果批量操作不打印SQL,请去除
excludecategories中的batch。对于批量操作打印重复的问题,请使用
MybatisPlusLogFactory(3.2.1新增)。请注意,该插件可能会带来性能损耗,不建议在生产环境中使用。

其它精细化的配置可以参考官方文档https://github.com/gavlyukovskiy/spring-boot-data-source-decorator
ynamic-datasour
