
前面整理了从使用DynamicDatasource进行多数据源配置、集成p6spy进行SQL监控调试、DynamicDatasource配合ShardingSphere进行多数据源分库分表配置的文章。可以移步到历史文章查看,这里就不再赘述。
springboot+mybatis-plus多数据源实现以及结合 p6spy 打印 SQL 日志
ShardingSphere集成dynamic-datasource实现多数据源的分库分表
前面配置分库分表时,只进行了简单的分库分表算法,都是基于租户id的,不同表的主键id都是从1开始自增的。
### 分片规则配置
# 分片算法类型
spring.shardingsphere.rules.sharding.sharding-algorithms.database-inline.type=INLINE
# 分片算法表达式
spring.shardingsphere.rules.sharding.sharding-algorithms.database-inline.props.algorithm-expression=db${tenant_id % 3}
# 分片算法类型
spring.shardingsphere.rules.sharding.sharding-algorithms.table-inline.type=INLINE
# 分片算法表达式
spring.shardingsphere.rules.sharding.sharding-algorithms.table-inline.props.algorithm-expression=account_${tenant_id % 2}
# 对account逻辑表与物理表进行映射
spring.shardingsphere.rules.sharding.tables.account.actual-data-nodes=db$->{0..2}.account_$->{0..1}
# 分库策略 分片列名称
spring.shardingsphere.rules.sharding.tables.account.database-strategy.standard.sharding-column=tenant_id
# 分库策略 分片算法名称
spring.shardingsphere.rules.sharding.tables.account.database-strategy.standard.sharding-algorithm-name=database-inline
# 分表策略 分片列名称
spring.shardingsphere.rules.sharding.tables.account.table-strategy.standard.sharding-column=tenant_id
# 分表策略 分片算法名称
spring.shardingsphere.rules.sharding.tables.account.table-strategy.standard.sharding-algorithm-name=table-inline因为公司是做SaaS服务的,基于租户的数据隔离,并且上层业务表都有tenantId,所以accountId分表后都从1开始自增也不会影响实际业务。某些场景下,如果需要分表后的主键id不相同,那么就需要配置主键id的生成规则。因为使用了ShardingSphere(自带UUID和SNOWFLAKE两种方案),下面在讲解时,会以配置ShardingSphere的主键ID生成为目标,同时ShardingSphere使用的版本依然是5.2.0 版本,不同版本ShardingSphere配置会有不同。
下面来了解一下分布式主键ID生成的几种方式:
利用各分片的初始值+步长来解决
初始值+步长的问题
这种方式很难维护,而且可扩展性极差,一旦要扩容分片表数量,原表数据变动比较大,所以这种方式不太可取,直接舍弃。
利用UUID做全局ID
UUID(Universally Unique Identifier)是一种全局唯一标识符,它保证在空间和时间上的唯一性。通常由 128 位的数字组成,采用 32 位的十六进制数表示,格式为 8-4-4-4-12 这样的 36 个字符(32 个字母数字字符和 4 个短横线),例如 550e8400-e29b-41d4-a716-446655440000。
虽然 UUID 可以保证全局唯一,ShardingSphere也自带了UUID方案,但并不推荐使用 UUID 来作为分库分表后的主键 ID。
看看ShardingSphere的源码UUIDKeyGenerateAlgorithm是怎么实现UUID的
@Getter
public final class UUIDKeyGenerateAlgorithm implements KeyGenerateAlgorithm {

    private Properties props;

    @Override
    public void init(final Properties props) {
        this.props = props;
    }

    @Override
    public String generateKey() {
        ThreadLocalRandom threadLocalRandom = ThreadLocalRandom.current();
        return new UUID(threadLocalRandom.nextLong(), threadLocalRandom.nextLong()).toString().replace("-", "");
    }

    @Override
    public String getType() {
        return "UUID";
    }
}
用UUID做主键的问题
UUID有128位,比数据库自增的BIGINT要占用的空间大得多,存储空间的增加会显著影响数据库的性能和成本;
MySQL的InnoDB引擎使用的是聚集索引,这意味着主键索引的物理存储顺序与数据的插入顺序紧密相关。UUID的随机性会导致数据插入时频繁的页分裂和碎片化,从而降低索引的效率。相比之下,自增ID的插入顺序是连续的,能够更好地利用索引的空间局部性。
由于UUID是随机生成的,查询时可能需要更多的磁盘I/O操作来查找数据。而自增ID由于其顺序性,查询时可以利用更少的磁盘I/O来定位数据。
UUID的随机性使得基于主键的排序和范围查询效率较低。而自增ID由于是有序的,执行这些操作时效率更高。
利用雪花算法做全局ID
SNOWFLAKE(雪花算法)是默认使用的主键生成方案,生成一个 64bit的长整型(Long)数据。
sharding-jdbc 中雪花算法生成的主键主要由 4部分组成,1bit符号位、41bit时间戳位、10bit工作进程位以及 12bit 序列号位。
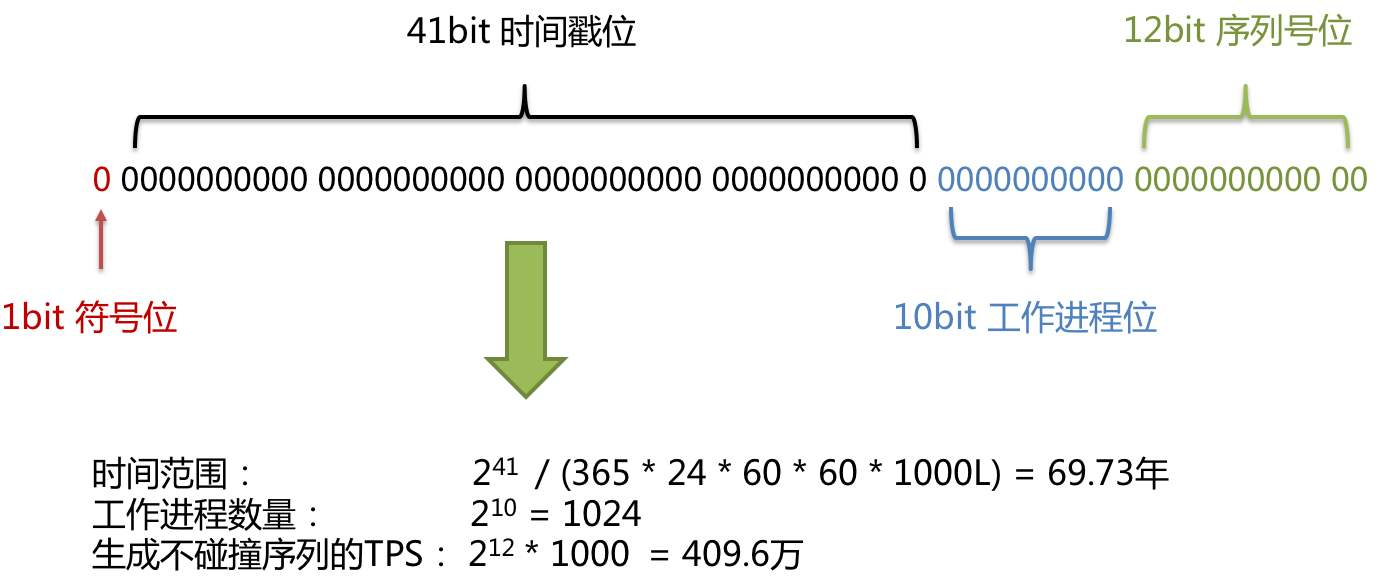
符号位(1bit位)
Java 中 Long 型的最高位是符号位,正数是0,负数是1,一般生成ID都为正数,所以默认为0
时间戳位(41bit)
41位的时间戳可以容纳的毫秒数是 2 的 41次幂,而一年的总毫秒数为 1000L * 60 * 60 * 24 * 365,计算使用时间大概是69年,我这辈子是用不完了。
工作进程位(10bit)
表示一个唯一的工作进程id,默认值为 0。
spring.shardingsphere.rules.sharding.key-generators.snowflake.props.worker.id=1
序列号位(12bit)
同一毫秒内生成不同的ID。
雪花算法的问题
时间回拨:雪花算法生成的 ID 依赖于系统的时间戳,要求系统的时钟必须是单调递增的。如果系统的时钟发生回拨,可能导致生成的 ID 重复。
时间回拨带来的性能和可用性:由于时间依赖性,当系统时钟发生回拨时,雪花算法需要进行额外的处理,如等待系统时钟追上上一次生成 ID 的时间戳或抛出异常。这种处理会对算法的可用性和性能产生一定影响。
时间回拨的原因:我们的硬件时钟可能会因为各种原因变得不准( 快了 或 慢了 ),此时就需要 ntp 服务来做时间校准,做校准的时候就会发生服务器时钟的 跳跃 或者 回拨 的问题。
解决方案
服务器时钟回拨会导致产生重复的 ID,SNOWFLAKE 方案中对原有雪花算法做了改进,增加了一个最大容忍的时钟回拨毫秒数。如果时钟回拨的时间超过最大容忍的毫秒数阈值,则程序直接报错;如果在可容忍的范围内,默认分布式主键生成器,会等待时钟同步到最后一次主键生成的时间后再继续工作。最大容忍的时钟回拨毫秒数,默认值为 10,可通过属性 spring.shardingsphere.rules.sharding.key-generators.snowflake.props.max.tolerate.time.difference.milliseconds 设置。
可以看看源码中是怎么实现的,逻辑在SnowflakeKeyGenerateAlgorithm#generateKey ,对lastMilliseconds和currentMilliseconds进行了比较,如果lastMilliseconds > currentMilliseconds则发生了时间回拨,那么接着判断两个时间的差值timeDifferenceMilliseconds是否在设置的最大容忍时间阈值 maxTolerateTimeDifferenceMilliseconds内,在阈值内则线程休眠差值时间 Thread.sleep(timeDifferenceMilliseconds),否则大于差值直接报异常。
public final class SnowflakeKeyGenerateAlgorithm implements KeyGenerateAlgorithm, InstanceAwareAlgorithm {

    public static final long EPOCH;

    private static final String MAX_VIBRATION_OFFSET_KEY = "max-vibration-offset";

    private static final String MAX_TOLERATE_TIME_DIFFERENCE_MILLISECONDS_KEY = "max-tolerate-time-difference-milliseconds";

    private static final long SEQUENCE_BITS = 12L;

    private static final long WORKER_ID_BITS = 10L;

    private static final long SEQUENCE_MASK = (1 << SEQUENCE_BITS) - 1;

    private static final long WORKER_ID_LEFT_SHIFT_BITS = SEQUENCE_BITS;

    private static final long TIMESTAMP_LEFT_SHIFT_BITS = WORKER_ID_LEFT_SHIFT_BITS + WORKER_ID_BITS;

    private static final int DEFAULT_VIBRATION_VALUE = 1;

    private static final int MAX_TOLERATE_TIME_DIFFERENCE_MILLISECONDS = 10;

    private static final long DEFAULT_WORKER_ID = 0;

    @Setter
    private static TimeService timeService = new TimeService();

    @Getter
    private Properties props;

    private int maxVibrationOffset;

    private int maxTolerateTimeDifferenceMilliseconds;

    private volatile int sequenceOffset = -1;

    private volatile long sequence;

    private volatile long lastMilliseconds;

    private volatile InstanceContext instanceContext;

    static {
        Calendar calendar = Calendar.getInstance();
        calendar.set(2016, Calendar.NOVEMBER, 1);
        calendar.set(Calendar.HOUR_OF_DAY, 0);
        calendar.set(Calendar.MINUTE, 0);
        calendar.set(Calendar.SECOND, 0);
        calendar.set(Calendar.MILLISECOND, 0);
        EPOCH = calendar.getTimeInMillis();
    }

    @Override
    public void init(final Properties props) {
        this.props = props;
        maxVibrationOffset = getMaxVibrationOffset(props);
        maxTolerateTimeDifferenceMilliseconds = getMaxTolerateTimeDifferenceMilliseconds(props);
    }

    @Override
    public void setInstanceContext(final InstanceContext instanceContext) {
        this.instanceContext = instanceContext;
        if (null != instanceContext) {
            instanceContext.generateWorkerId(props);
        }
    }

    private int getMaxVibrationOffset(final Properties props) {
        int result = Integer.parseInt(props.getOrDefault(MAX_VIBRATION_OFFSET_KEY, DEFAULT_VIBRATION_VALUE).toString());
        Preconditions.checkArgument(result >= 0 && result <= SEQUENCE_MASK, "Illegal max vibration offset.");
        return result;
    }

    private int getMaxTolerateTimeDifferenceMilliseconds(final Properties props) {
        return Integer.parseInt(props.getOrDefault(MAX_TOLERATE_TIME_DIFFERENCE_MILLISECONDS_KEY, MAX_TOLERATE_TIME_DIFFERENCE_MILLISECONDS).toString());
    }

    @Override
    public synchronized Long generateKey() {
        long currentMilliseconds = timeService.getCurrentMillis();
        if (waitTolerateTimeDifferenceIfNeed(currentMilliseconds)) {
            currentMilliseconds = timeService.getCurrentMillis();
        }
        if (lastMilliseconds == currentMilliseconds) {
            if (0L == (sequence = (sequence + 1) & SEQUENCE_MASK)) {
                currentMilliseconds = waitUntilNextTime(currentMilliseconds);
            }
        } else {
            vibrateSequenceOffset();
            sequence = sequenceOffset;
        }
        lastMilliseconds = currentMilliseconds;
        return ((currentMilliseconds - EPOCH) << TIMESTAMP_LEFT_SHIFT_BITS) | (getWorkerId() << WORKER_ID_LEFT_SHIFT_BITS) | sequence;
    }

    @SneakyThrows(InterruptedException.class)
    private boolean waitTolerateTimeDifferenceIfNeed(final long currentMilliseconds) {
        if (lastMilliseconds <= currentMilliseconds) {
            return false;
        }
        long timeDifferenceMilliseconds = lastMilliseconds - currentMilliseconds;
        Preconditions.checkState(timeDifferenceMilliseconds < maxTolerateTimeDifferenceMilliseconds,
                "Clock is moving backwards, last time is %d milliseconds, current time is %d milliseconds", lastMilliseconds, currentMilliseconds);
        Thread.sleep(timeDifferenceMilliseconds);
        return true;
    }

    private long waitUntilNextTime(final long lastTime) {
        long result = timeService.getCurrentMillis();
        while (result <= lastTime) {
            result = timeService.getCurrentMillis();
        }
        return result;
    }

    @SuppressWarnings("NonAtomicOperationOnVolatileField")
    private void vibrateSequenceOffset() {
        sequenceOffset = sequenceOffset >= maxVibrationOffset ? 0 : sequenceOffset + 1;
    }

    private long getWorkerId() {
        return null == instanceContext ? DEFAULT_WORKER_ID : instanceContext.getWorkerId();
    }

    @Override
    public String getType() {
        return "SNOWFLAKE";
    }

    @Override
    public boolean isDefault() {
        return true;
    }
}
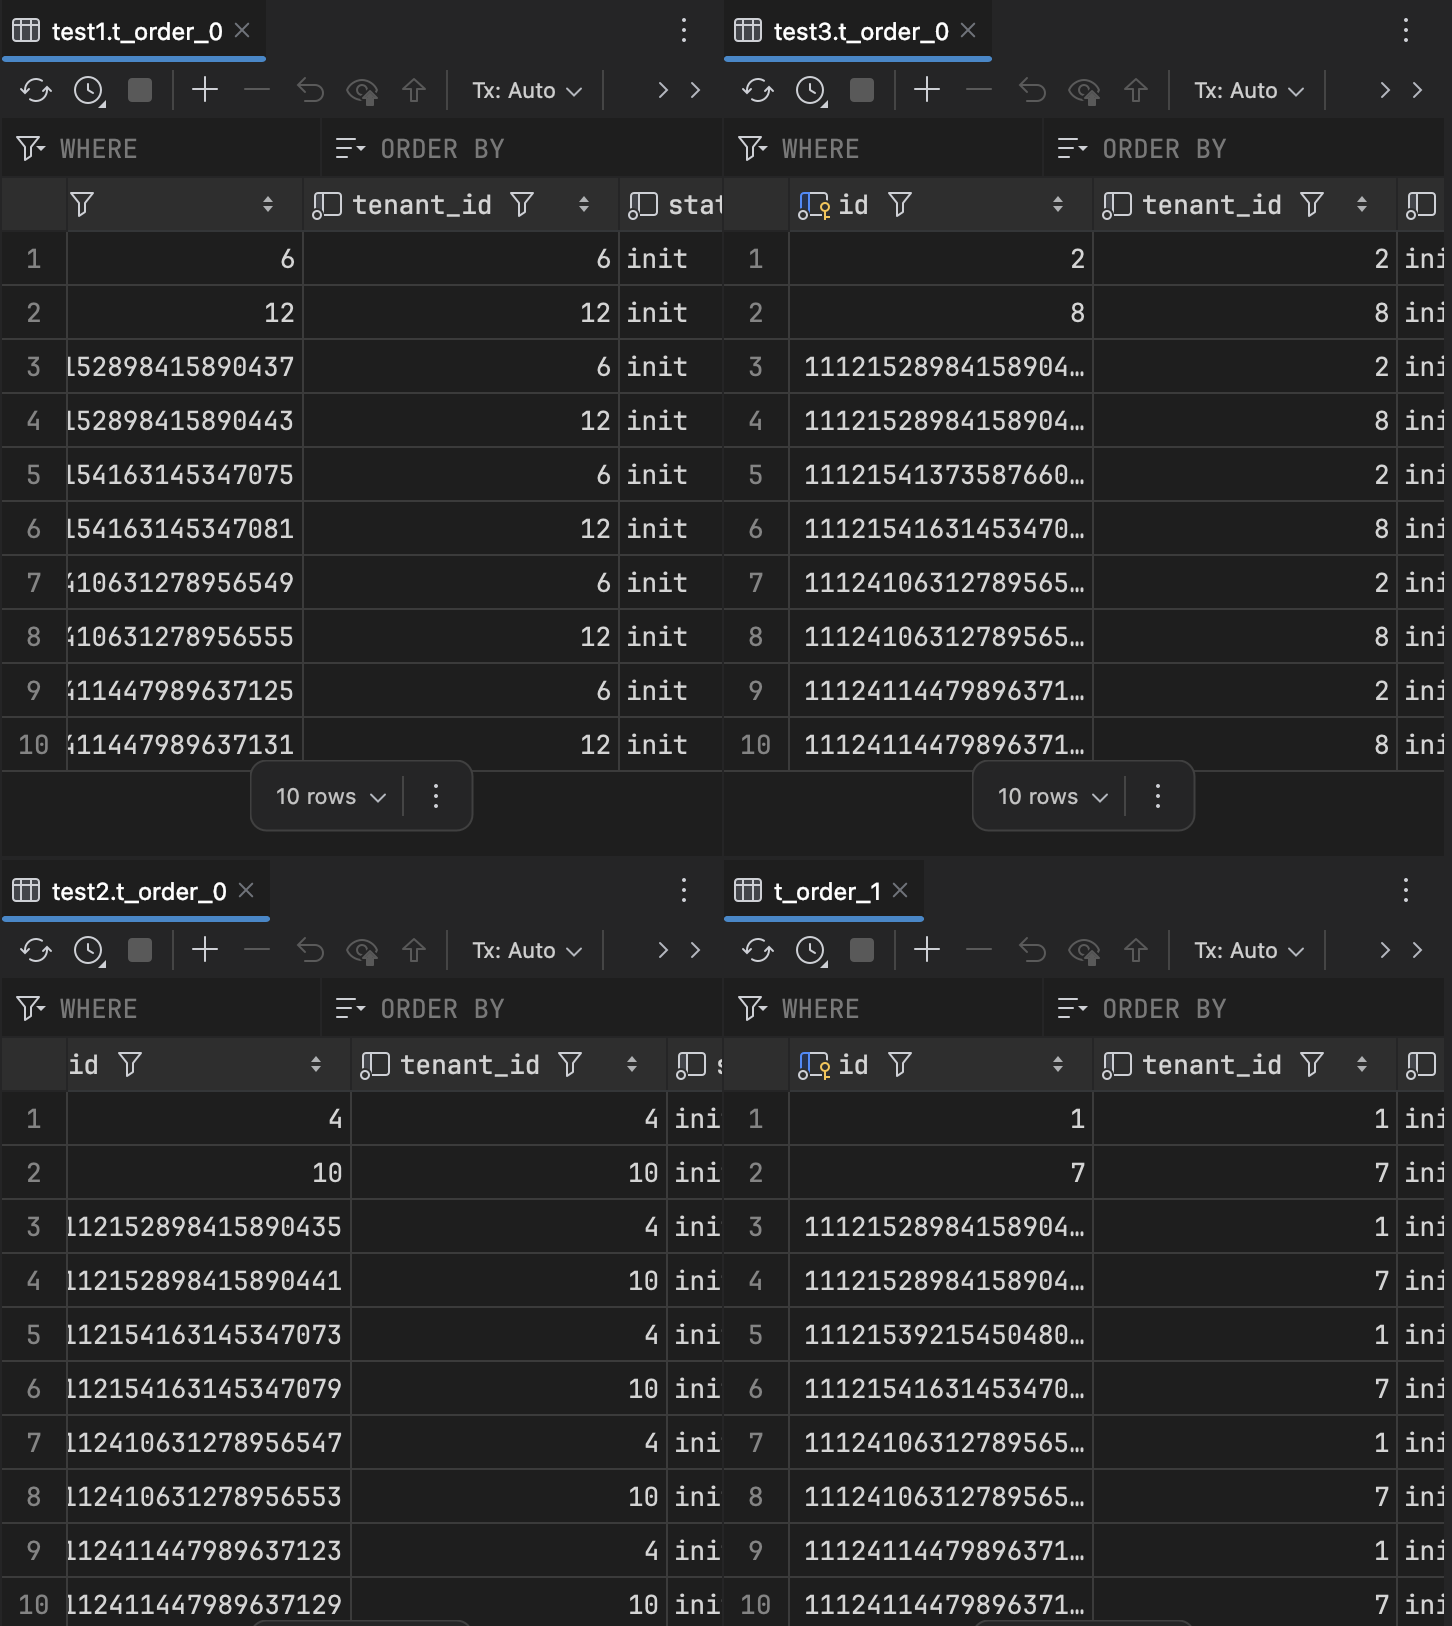
对t_order表进行分库分表并配置雪花算法ID
# shardingsphere主键生成策略
spring.shardingsphere.rules.sharding.default-key-generate-strategy.column=id
spring.shardingsphere.rules.sharding.default-key-generate-strategy.key-generator-name=snowflake
spring.shardingsphere.rules.sharding.key-generators.snowflake.type=SNOWFLAKE
# 设置工作进程id
spring.shardingsphere.rules.sharding.key-generators.snowflake.props.worker-id=1
# 设置最大容忍时间差(毫秒)
spring.shardingsphere.rules.sharding.key-generators.snowflake.props.max.tolerate.time.difference.milliseconds=6000
# 分片算法类型
spring.shardingsphere.rules.sharding.sharding-algorithms.database-inline.type=INLINE
# 分片算法表达式
spring.shardingsphere.rules.sharding.sharding-algorithms.database-inline.props.algorithm-expression=db${tenant_id % 3}
# 分片算法类型
spring.shardingsphere.rules.sharding.sharding-algorithms.table-inline.type=INLINE
# 分片算法表达式
spring.shardingsphere.rules.sharding.sharding-algorithms.table-inline.props.algorithm-expression=t_order_${tenant_id % 2}
### 配置表主键生成的数据库字段名称
spring.shardingsphere.rules.sharding.tables.t_order.key-generate-strategy.column=id
# 配置表的主键生成策略
spring.shardingsphere.rules.sharding.tables.t_order.key-generate-strategy.key-generator-name=snowflake
# 对t_order逻辑表与物理表进行映射
spring.shardingsphere.rules.sharding.tables.t_order.actual-data-nodes=db$->{0..2}.t_order_$->{0..1}
# 分库策略 分片列名称
spring.shardingsphere.rules.sharding.tables.t_order.database-strategy.standard.sharding-column=tenant_id
# 分库策略 分片算法名称
spring.shardingsphere.rules.sharding.tables.t_order.database-strategy.standard.sharding-algorithm-name=database-inline
# 分表策略 分片列名称
spring.shardingsphere.rules.sharding.tables.t_order.table-strategy.standard.sharding-column=tenant_id
# 分表策略 分片算法名称
spring.shardingsphere.rules.sharding.tables.t_order.table-strategy.standard.sharding-algorithm-name=table-inline利用Redisincr命令实现ID的原子性自增
127.0.0.1:6379> set seq_id 1     // 初始化自增ID为1
OK
127.0.0.1:6379> incr seq_id      // 增加1,并返回递增后的数值
(integer) 2bash
用redis生成ID的问题
需要考虑redis持久化的问题,redis有两种持久化方式RDB和AOF
RDB会定时打一个快照进行持久化,假如连续自增但redis没及时持久化,而这会Redis挂掉了,重启Redis后会出现ID重复的情况。AOF会对每条写命令进行持久化,即使Redis挂掉了也不会出现ID重复的情况,但由于incr命令的特殊性,会导致Redis重启恢复的数据时间过长。
其他第三方分布式ID
如百度(uid-generator) 、美团(Leaf) 、滴滴(Tinyid) 等,基本都是基于雪花算法的思想,进行了部分改造,但是需要额外的付出(依赖数据库或者ZooKeeper或者需要部署单独服务)
自定义实现分布式ID生成(实现KeyGenerateAlgorithm)
package com.example.dynamicdatasource.config;

import org.apache.shardingsphere.sharding.spi.KeyGenerateAlgorithm;

import java.util.Properties;
import java.util.concurrent.atomic.AtomicLong;

/**
 * 自定义分布式ID生成规则
 * Create DateTime: 2025/3/28 14:38
 *
 * @author zhangchangsheng
 **/
public class MyKeyGenerateAlgorithm implements KeyGenerateAlgorithm {


    private static AtomicLong counter = new AtomicLong(0);

    /**
     * Generate key.
     *
     * @return generated key
     */
    @Override
    public Comparable<?> generateKey() {
        return counter.incrementAndGet();
    }

    /**
     * Get properties.
     *
     * @return properties
     */
    @Override
    public Properties getProps() {
        return null;
    }

    /**
     * Initialize SPI.
     *
     * @param props properties to be initialized
     */
    @Override
    public void init(Properties props) {

    }

    /**
     * Get type.
     *
     * @return type
     */
    @Override
    public String getType() {
        return "MY_GENERATE_ID";
    }

}
我这里简单的用AtomicLong模拟了一个分布式ID的自定义类型,修改配置文件中的主键生成策略
# shardingsphere主键生成策略
spring.shardingsphere.rules.sharding.default-key-generate-strategy.column=id
spring.shardingsphere.rules.sharding.default-key-generate-strategy.key-generator-name=snowflake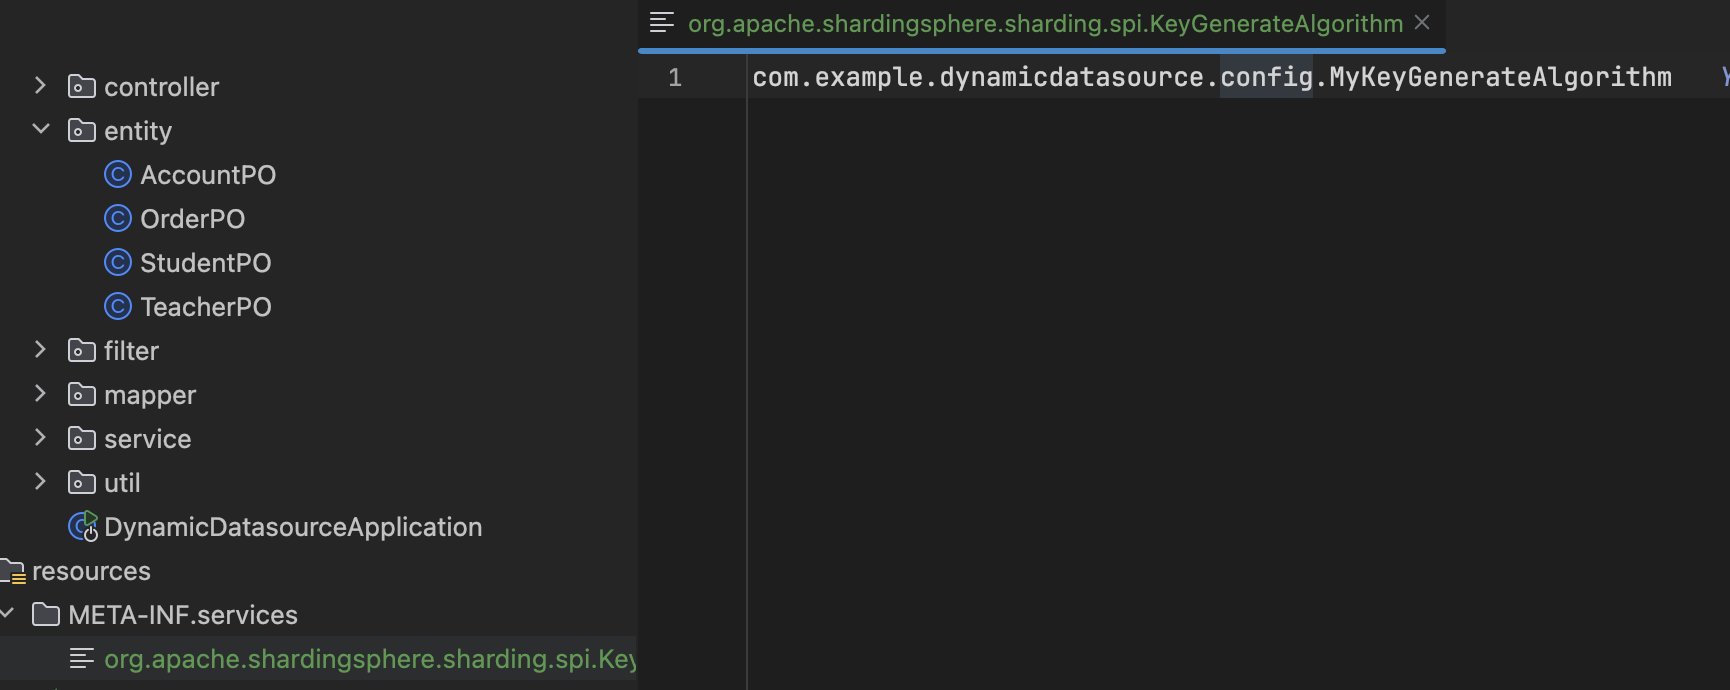
spring.shardingsphere.rules.sharding.key-generators.snowflake.type=MY_GENERATE_ID自定义类型是通过SPI实现的,所以最后还需要添加一个SPI配置,在resource下面的META-INF/services生成一个文件org.apache.shardingsphere.sharding.spi.KeyGenerateAlgorithm,配置算法类的全路径。
保存到数据库后,要用实体的主键值,会获取不到,推荐在插入前调用generateKey方法生成key,在保存前的时候就赋值。
